The Itinerary Generator
The core of TravelAce is its ability to generate detailed, day-by-day travel plans tailored to your needs. This tool is perfect for creating a structured yet flexible foundation for your trip.
1.1 Filling Out the Planning Form
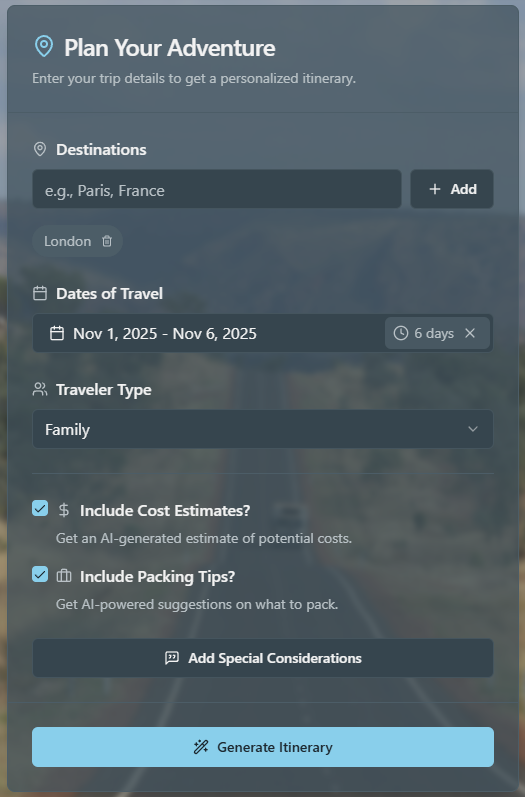
To start, you'll find the planning form on our homepage. Here's a breakdown of each field:
- Origin: Enter your starting city. You can also use the location button to set it automatically. This helps the AI with flight and travel time context.
- Destinations: Enter the city and country you want to visit (e.g., "Rome, Italy"). You can add multiple destinations for a multi-city trip. If you need ideas, check out the AI-powered suggestions!
- Dates of Travel: Select a start and end date for your trip. The duration is calculated automatically, and trips can be between 1 and 14 days long.
- Traveler Type: Choose who you're traveling with (e.g., Solo, Family). This helps the AI suggest appropriate activities.
- Special Considerations: This is a powerful optional field. Click the button to open a dialog where you can inform the AI about any specific needs or interests, such as "we need wheelchair-accessible restaurants," "we are on a tight budget," or "we love art museums and photography."
- AI Generation Options:
- Cost Estimates: Check this to receive a detailed budget breakdown for your trip.
- Packing Tips: Get a tailored packing list based on your destination and dates.
- Meal Suggestions: The AI will add breakfast, lunch, and dinner ideas into your daily schedule.
- Accommodation Suggestions: Receive a list of recommended places to stay.
1.2 Finding Destination Ideas
Not sure where to go? Use our AI-powered Destination Finder to get inspired. On the homepage planner, click the "Suggest" button next to the destinations input. This will open a side sheet where you can:
- Set Preferences: Select your interests, preferred continents, climate, and budget.
- Get AI Suggestions: The AI will provide 5 unique destination ideas based on your criteria, each with a short reason why it's a good fit.
- Add to Your Trip: Click "Add" on any suggestion to instantly add it to your list of destinations for planning.
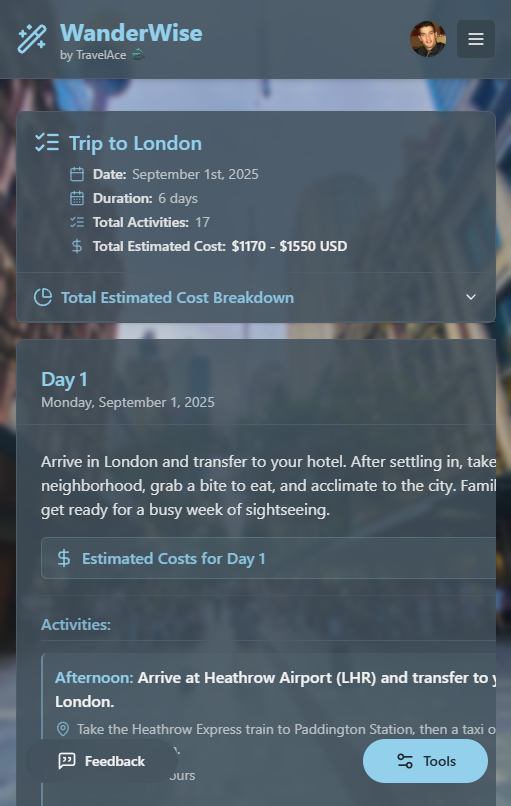
1.3 Interacting with Your Itinerary
Once your itinerary is generated, you have full control to customize it:
- Edit Day Plan: Each day has a summary plan. Click "Edit Plan" to modify this text to better suit your goals.
- Add Activity: Click the "Add Activity" button to open a dialog. You can choose from AI-powered suggestions or manually add your own activity with a time and description.
- Delete Activity: Hover over any activity to reveal a trash can icon. Click it to remove the activity from your plan.
- View Activity Details: Click on an activity's image to open a lightbox. This view provides more details, such as a map of the location, transport advice, and links to official websites.
1.4 Saving, Sharing & Exporting
Your itinerary isn't just for viewing. Use the floating Tools button to access these features:
- Export to PDF: Download a clean, formatted PDF of your itinerary for easy offline access during your travels, ensuring you have your plans, even without an internet connection.
- Activity Map: View all your activities with coordinates pinned on an interactive map. You can navigate day by day.
- Timeline View: See a chronological, vertical timeline of your entire trip.
- Save & Share: To save your progress or share your trip with others, you must first sign in. Once signed in, a "Save Changes" button will appear when you make edits. After saving, you can use the "Share" button in the tools menu to generate a public link.
TravelAce AI
TravelAce AI is your personal travel expert. It's perfect for asking specific questions, getting recommendations, or researching aspects of your trip that the main itinerary generator might not cover.
2.1 Starting a New Chat
To begin a conversation:
- Navigate to the TravelAce AI page from the header.
- Enter a destination you want to ask questions about.
- Click "Start New Chat." You must be signed in to use the chat.
You can ask anything! Try one of these examples to get started:
- “What are the top 3 best ramen restaurants in Tokyo for under $15?”
- “Is it easy to get around Kyoto using only public transport?”
- “What is a good day trip from Paris for a family with young children?”
- “I'm in Rome. Suggest an authentic, non-touristy neighborhood for dinner tonight.”
- “Are there any special festivals or events happening in Barcelona during the first week of June?”
- “What's the most scenic way to travel from Florence to the Cinque Terre?”
2.2 Chatting Within an Itinerary
For more focused advice, you can start a chat directly from a saved itinerary. This provides the AI with the full context of your existing plans.
- Open one of your saved itineraries.
- In the card for any given day, open the "Ask the TravelAce AI" section.
- Click on one of the suggested prompts or the "Start a new chat" link.
The AI will know your destinations and daily plans, allowing you to ask highly specific questions like, "What's the best way to get from my first activity to my second on Day 3?" or "Are there any good cafes near my hotel for breakfast on Day 5?"
2.3 Managing Your Chats
Your chat conversations are automatically saved. When you visit the TravelAce AI page, you will see a list of your previous chats. You can:
- Resume a Chat: Click on any saved chat card to load the conversation history and continue where you left off.
- Delete a Chat: Click the trash can icon on a chat card to permanently delete that conversation.
Local Lens
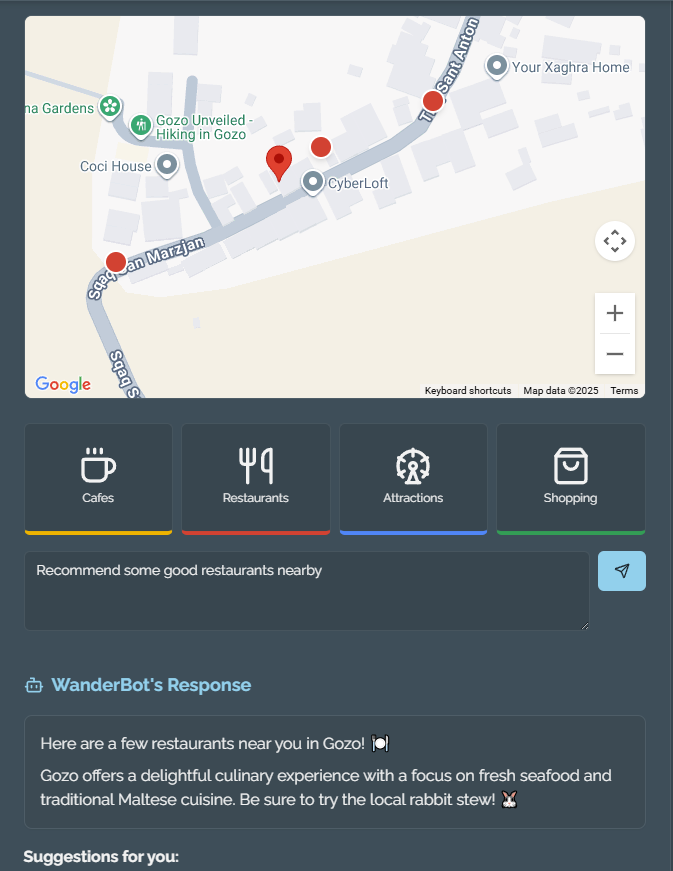
Local Lens is your real-time, location-aware AI guide. Use it when you're on the ground at your destination to get instant information about your surroundings.
Using Local Lens
To use this feature, you'll need to grant location access in your browser.
- Navigate to the Local Lens page. Your browser will prompt you for location permission.
- Your current location will be displayed on an interactive map.
- Use the quick recommendation buttons (e.g., "Cafes", "Restaurants") or type your own question into the text box.
- The AI will provide a direct answer and, if applicable, pin suggestions to your map.
Understanding the Results
The AI provides two types of information:
- A direct answer to your question, such as a fun fact or historical context.
- A list of nearby suggestions with pins on the map if you ask for recommendations. You can click on these pins for more details.
The Cost Estimator
Budgeting is a critical part of travel planning. Our standalone Cost Estimator tool provides a detailed, AI-powered financial forecast for your trip without needing to generate a full itinerary first.
Using the Estimator
To get your estimate, you will provide similar details to the itinerary planner:
- Origin & Destinations: Tell the AI where your trip starts and where you're going.
- Travel Dates: The duration of your trip affects accommodation and daily spending.
- Travel Style: Select 'Budget', 'Mid-Range', or 'Luxury' to help the AI calibrate its cost predictions.
Understanding the Results
The AI will generate a comprehensive report that includes:
- A Total Estimated Cost in the local currency.
- A categorical breakdown of costs (Flights, Accommodation, Food, etc.), complete with a pie chart for easy visualization.
- A detailed Daily Expense Timeline, showing projected spending for each day of your trip.

Currency Converter
Need to quickly check exchange rates? The Currency Converter tool, found in the main "Tools" menu, provides up-to-date conversions between a wide range of global currencies.
- Select Currencies: Choose your 'from' and 'to' currencies from the dropdown lists.
- Enter Amount: Input the amount you wish to convert.
- Get Instant Results: The tool will display the converted amount based on the latest exchange rates.
The Community Hub
Get inspired and see how other travelers explore the world. The Community Hub is where users can share their saved itineraries, discover new ideas, and offer feedback.
6.1 Browsing the Hub
Visit the Community Hub to see a feed of publicly shared trips. You can:
- View Posts: Click "View" on any post to see the full itinerary and read the author's notes.
- Copy Trips: If you find a trip you like, click "Copy to My Trips" to add a personal, editable version of it to your own account.
- Leave Comments: Engage with other travelers by leaving comments and suggestions on their posts.
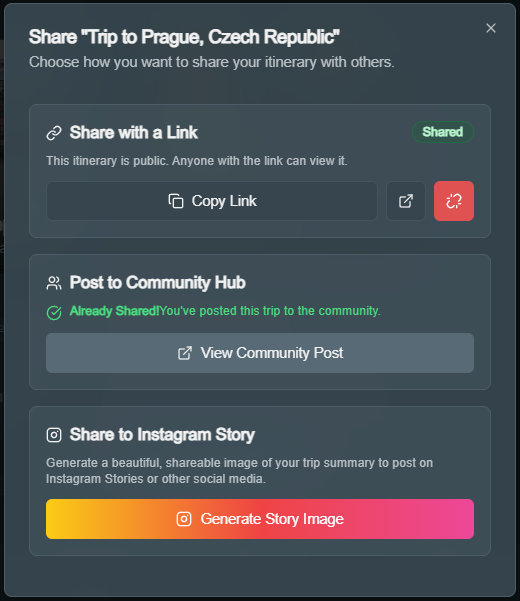
6.2 Sharing Your Trip
To share one of your own itineraries with the community, follow these steps:
- First, make sure you have saved the itinerary you want to share.
- From the itinerary page, open the floating Tools menu.
- Click the Share button to open the sharing options.
- Click "Share to Community Hub". You'll be prompted to write a short message about your trip.
- Once you post it, your trip will be visible to everyone in the Community Hub!
The Travel Journal
Once you've saved an itinerary, you can begin to document your journey. The Travel Journal transforms your plans into lasting memories by allowing you to record your experiences, thoughts, and photos for each trip.
7.1 Accessing Your Journal
You can access your journals for any saved trip:
- Make sure you are signed in.
- Navigate to the My Journal page from the header menu.
- You will see a card for each of your saved itineraries. Click "Open Journal" on any card to view or add entries for that trip.
7.2 Writing a Journal Entry
On the journal page for a specific trip, you can add an entry with the following details. It's a great way to capture memories as they happen or reflect on your day in the evening.
- Title & Content: Give your entry a title and write your thoughts in the main content area.
- Date & Time: Select the date of your memory and optionally add a specific time.
- Upload Photos: Click "Add Photo" to upload up to 5 images for each journal entry.
- Save Your Entry: Click the "Save Entry" button. Your new memory, complete with photos, will be added to the timeline below.
My Profile: Your Travel Identity
Your Profile Page is your space to express your travel personality. Keeping it updated helps you connect with like-minded travelers and allows us to tailor your experience better in the future.
8.1 Personalizing Your Profile
Here’s how you can make your profile your own:
- Edit Username & Bio: Click the edit icon next to your username or bio to add or change them. A good bio tells others what kind of traveler you are!
- Choose Travel Interests: Select from a list of interests like "Adventure", "Culinary", "Luxury", or "History". These will be displayed as badges on your profile, giving others a quick glimpse into your travel style.
- Build Your Wishlist: Add destinations to your travel wishlist to keep track of where you want to go next.
- Change Your Banner: Personalize your profile header by choosing a banner image based on your selected interests.
8.2 Explorer Level Gamification
We believe in celebrating your journey as a traveler. The "Explorer Level" is a fun way to track your activity and engagement within the TravelAce community.
- How It Works: You earn points for planning trips and sharing your itineraries in the Community Hub. The more you plan and share, the higher your level becomes.
- Levels: Progress through ranks from Wanderer to Voyager, Adventurer, Globetrotter, and finally, the esteemed Pathfinder.
- Show It Off: Your Explorer Level badge is displayed next to your name on any posts you make in the Community Hub, showcasing your experience to fellow travelers.
Account Management
9.1 Deleting Your Account
We believe in giving you full control over your data. If you wish to delete your account, you can do so from your Profile Page.
When you delete your account, all of your personal data, including your saved itineraries and chat histories, will be permanently erased from our systems. This data cannot be recovered.
To proceed:
- Go to your Profile Page.
- Scroll down to the "Account Management" section.
- Click the "Delete Account" button.
- A confirmation dialog will appear. Read the warning carefully and, if you are sure, type "DELETE" into the text field and click the final confirmation button.
Have More Questions?
If your question wasn't answered here, please visit our dedicated FAQ page for more information.